
Page 31 - Winter 2008
P. 31
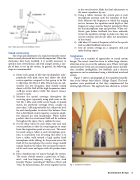
  Fig. 6. Basic parameters for feedback control.
 or her own favorites. Make the final adjustments to
the music equalizers by ear;
5) Using a talker, increase the system gain at each
microphone position until the initiation of feed- back. Measure the frequency at which the ringing occurs. Increase the equalizer notch depth at that frequency using a narrow band or parametric filter for that microphone type and position. When suf- ficient gain before feedback has been achieved, review the equalizer settings to make sure they are not too extreme and do not affect the naturalness of the sound;
6) Add about 10 cents of frequency shift to the speech feed as added feedback insurance;
7) Save all system settings on a computer disk and make backup copies.
Conclusions
There are a number of approaches to sound system design. The recent trend has been to utilize large clusters, often line arrays to cover the audience area. Where very high sound pressure levels are not required, good source localiza- tion, excellent intelligibility, low feedback, and a discrete appearance can be maintained using a distributed overhead system.
Figure 7 shows a photograph of the completed installa- tion at the Mount Saint Mary’s College Chapel. The loud- speakers were positioned so that they complemented the existing light fixtures. The approach also allowed us to limit
Sound system setup
The setup and adjustment of a sound system after instal- lation is rarely discussed but is critically important. When the electronics have been installed, it is usually necessary to spend at least several hours, and with a larger system, a cou- ple of days, to set up the system. In general, the following steps are recommended:
1) Excite each group of like-type loudspeakers inde- pendently with pink noise and adjust the third octave equalizer assigned to that group to be flat (1 dB) from 100 Hz to 3 kHz. When there are sub- woofers the low frequency limit should extend down to 80 Hz. Roll off the high frequencies about 4 dB per octave above 3 kHz. For concert venues, season to taste;
2) Measure the spatial coverage throughout the receiving space separately using pink noise in the 500 Hz, 1 kHz, and 2 kHz octave bands. It should match the predicted coverage levels, usually no more than 2 dB and preferably less. Adjust the level for each loudspeaker to achieve this balance. Note that a distributed system requires a separate ampli- fier channel for each loudspeaker. While theory predicts that the reverberant field will be uniform throughout the space, this is seldom the case;
3) Set the delay times for each delay zone and each source position so that the sound appears to come from the origination point at every seat. This must be tested using a talker at each microphone posi- tion. A convenient way of testing this effect is to have a talker walk toward a high quality fixed microphone while talking. As the person enters the field of the microphone the source image should remain fixed on the talker. The test must be repeat- ed for each zone and again with all speaker zones on;
4) Play a familiar piece of music through the system. The music should contain a good mix of high-, mid-, and low-frequency energy. I have used Jennifer Warnes’ recording of “Bird on a Wire,” and “Stay,” by Allison Krauss, but every engineer has his
Fig. 7. Completed installation.
  Sound System Design 29
